This guide documents the steps required to create a Secure Network Communications (SNC) connection to the SAP gateway. It takes inspiration from this SAP Blog.
Step 1. Export the AS ABAP public key
- On the AS ABAP, start transaction STRUST.
- Select the SNC SAPCryptolib entry.
- Double click on the certificate in the certificate list to select it.
- Ensure the certificate details are displayed in the lower portion of the screen.
- Export the certificate using the menu option More>Certificate>Export or clicking on the button shown:

- Enter the path and filename and select Base64 as the file format:

Step 2. Create a folder for the secure connection files on the ERP-Scale PC
We will need to a folder to store the encryption files on PC where ERP-Scale is being installed.
- Create a folder on the PC.

- Create the system environment variable SECUDIR pointing to this folder:
 After adding the system environment variable, you will need to restart the PC.
Step 3. Create a PSE for ERP-Scale
In the folder where the SAPCryptolib has been installed execute the following command:
sapgenpse get_pse [-p <PSE_name>] [-x <PIN>] [DN]
sapgenpse get_pse -p “SNC.pse” -x passw1234 “CN=DESKTOP-ES12”
Step 4. Add the AS ABAP primary key to the ERP-Scale PSE
In order for the PSE to have the correct certification path, we must import public key from the AS ABAP certificate to the ERP-Scale PSE.
In the folder where the SAPCryptolib has been installed execute the following command:
sapgenpse maintain_pk [-a <cert_file>] -p <PSE_name> [-x <PIN>]
Example:
sapgenpse maintain_pk -a “.\AsAbap.crt” -p “SNC.pse” -x passw1234
Step 5. Create a certificate from the ERP-Scale PSE
We need to add a certificate to STRUST for each installation of ERP-Scale. First we create this certificate from the ERP-Scale PSE.
In the folder where the SAPCryptolib has been installed execute the following command:
sapgenpse export_own_cert -o <output_file> -p <PSE_name> [- x <PIN>]
Example:
sapgenpse.exe export_own_cert -o “.\DESKTOP-ES12.crt” -p “SNC.pse” -x passw1234
Step 6. Import the ERP-Scale certificate into AS ABAP
We need to import the certificate to STRUST for each installation of ERP-Scale.
- On the AS ABAP, start transaction STRUST.
- Select the SNC SAPCryptolib entry.
- Import the certificate using the menu option More>Certificate>Export or clicking on the button shown:

- Select the certificate created in step 5:

- The certificate will be displayed in the lower half of the screen:

- The click “Add to certificate list” and save.
- The certificate for the ERP-Scale PC will now be displayed in the upper half of the screen:

Step 7. Configure the RFC connection in AS ABAP to use SNC
After uploading the certificate to STRUST, we can now configure the RFC connection using SM59.
- On the AS ABAP, start transaction SM59.
- Select the RFC destination and click edit.
- Select the “Logon & Security” tab:

- Click on SNC and configure the SNC connection:
 The distinguished name entered in the Partners field must exactly match the subject of the certificate created for installation of ERP-Scale relevant for the RFC destination (prefixed with p:).
- Set the SNC connection to Active and save the changes:

Step 8. Copy the files to the PC where ERP-Scale is being installed
Add a copy of sapcrypto.dll to the folder created in step 2.

Step 9. Add user credentials to the ERP-Scale PSE
Add login credentials for the user account under which the Pocket Programs SapScaleService Windows service is run.
In the folder where the SAPCryptolib has been installed execute the following command:
sapgenpse seclogin [-p <PSE_name>] [-x <PIN>] [-O [<NT_Domain>\]<user_ID>]
sapgenpse seclogin -p “SNC.pse” -x passw1234 -O SYSTEM
Step 10. Configure the RFC connection in ERP-Scale to use SNC
After creating the PSE and adding it to the ERP-Scale PC, we can now configure the RFC connection in ERP-Scale to use SNC.
- Start the ERP-Scale configuration utility.
- If it does not already exist, add the RFC destination:

- Click on the SNC button and add the settings for SNC:
 The SNC library location should point to the library used to secure the connection. This is typically sapscrypto.dllSNC my name in ERP-Scale must match Partners in the RFC destination in SM59
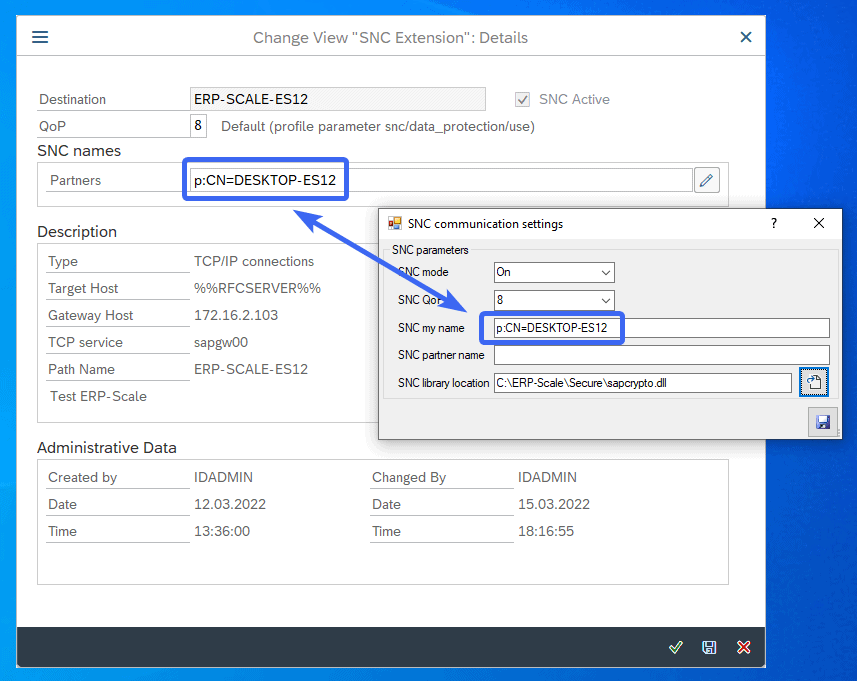
- Save the SNC settings and upload the RFC destination to the SapScaleServer:


Step 11: Test the connection
- On the AS ABAP, start transaction SM59.
- Select the RFC destination and click Connection Test.